
Credentials, Certificate and Authorization
To integrate the Gerencianet's Pix API to your system or platform, you must have a Digital Gerencianet Account.
Don't have a account?
Once you have access, you will be able to obtain the credentials and certificate needed to communicate with the Pix Gerencianet API.
See below how to obtain the credentials, certificates and details about the authorization and security of your integration with Gerencianet.
Getting application credentials
An integrator can create as many applications as he wants. For each application, 2 pairs of keys Client_Id and Client_Secret are generated, one pair for use in a Production environment (?) and the other for Homologation (?).
Using the Gerencianet's Pix API, the integrator can generate Pix transactions (payments and receipts), configure Webhooks to receive notifications via callbacks and access exclusive features of the Digital Gerencianet Account.
Understanding application's scopes
When creating or editing an application in your Gerencianet Account, you will need to configure the scopes that the application will have access to. The choice of these scopes defines which actions an application will be authorized to perform via API.
The scopes available in the Gerencianet's Pix API are listed below with their respective descriptions:
cob.write- Permission to alteration of charges;cob.read- Permission to charge consultation;pix.write- Permission to alteration of Pix;pix.read- Permission to Pix consultation;pix.send- Permission to request sending pix;webhook.write- Permission to alteration of webhook;webhook.read- Permission to webhook consultation;payloadlocation.write- Permission to create payload location;payloadlocation.read- Permission to location consultation;gn.pix.evp.write- Permission to create/remove key evp;gn.pix.evp.read- Permission to list key evp;gn.balance.read- Permission to fetch account balance;gn.settings.write- Permission to create/modify account settings;gn.settings.read- Permission to list account settings.gn.reports.write- Permission to request reconciliation extract.gn.reports.read- Permission to download reconciliation extract.
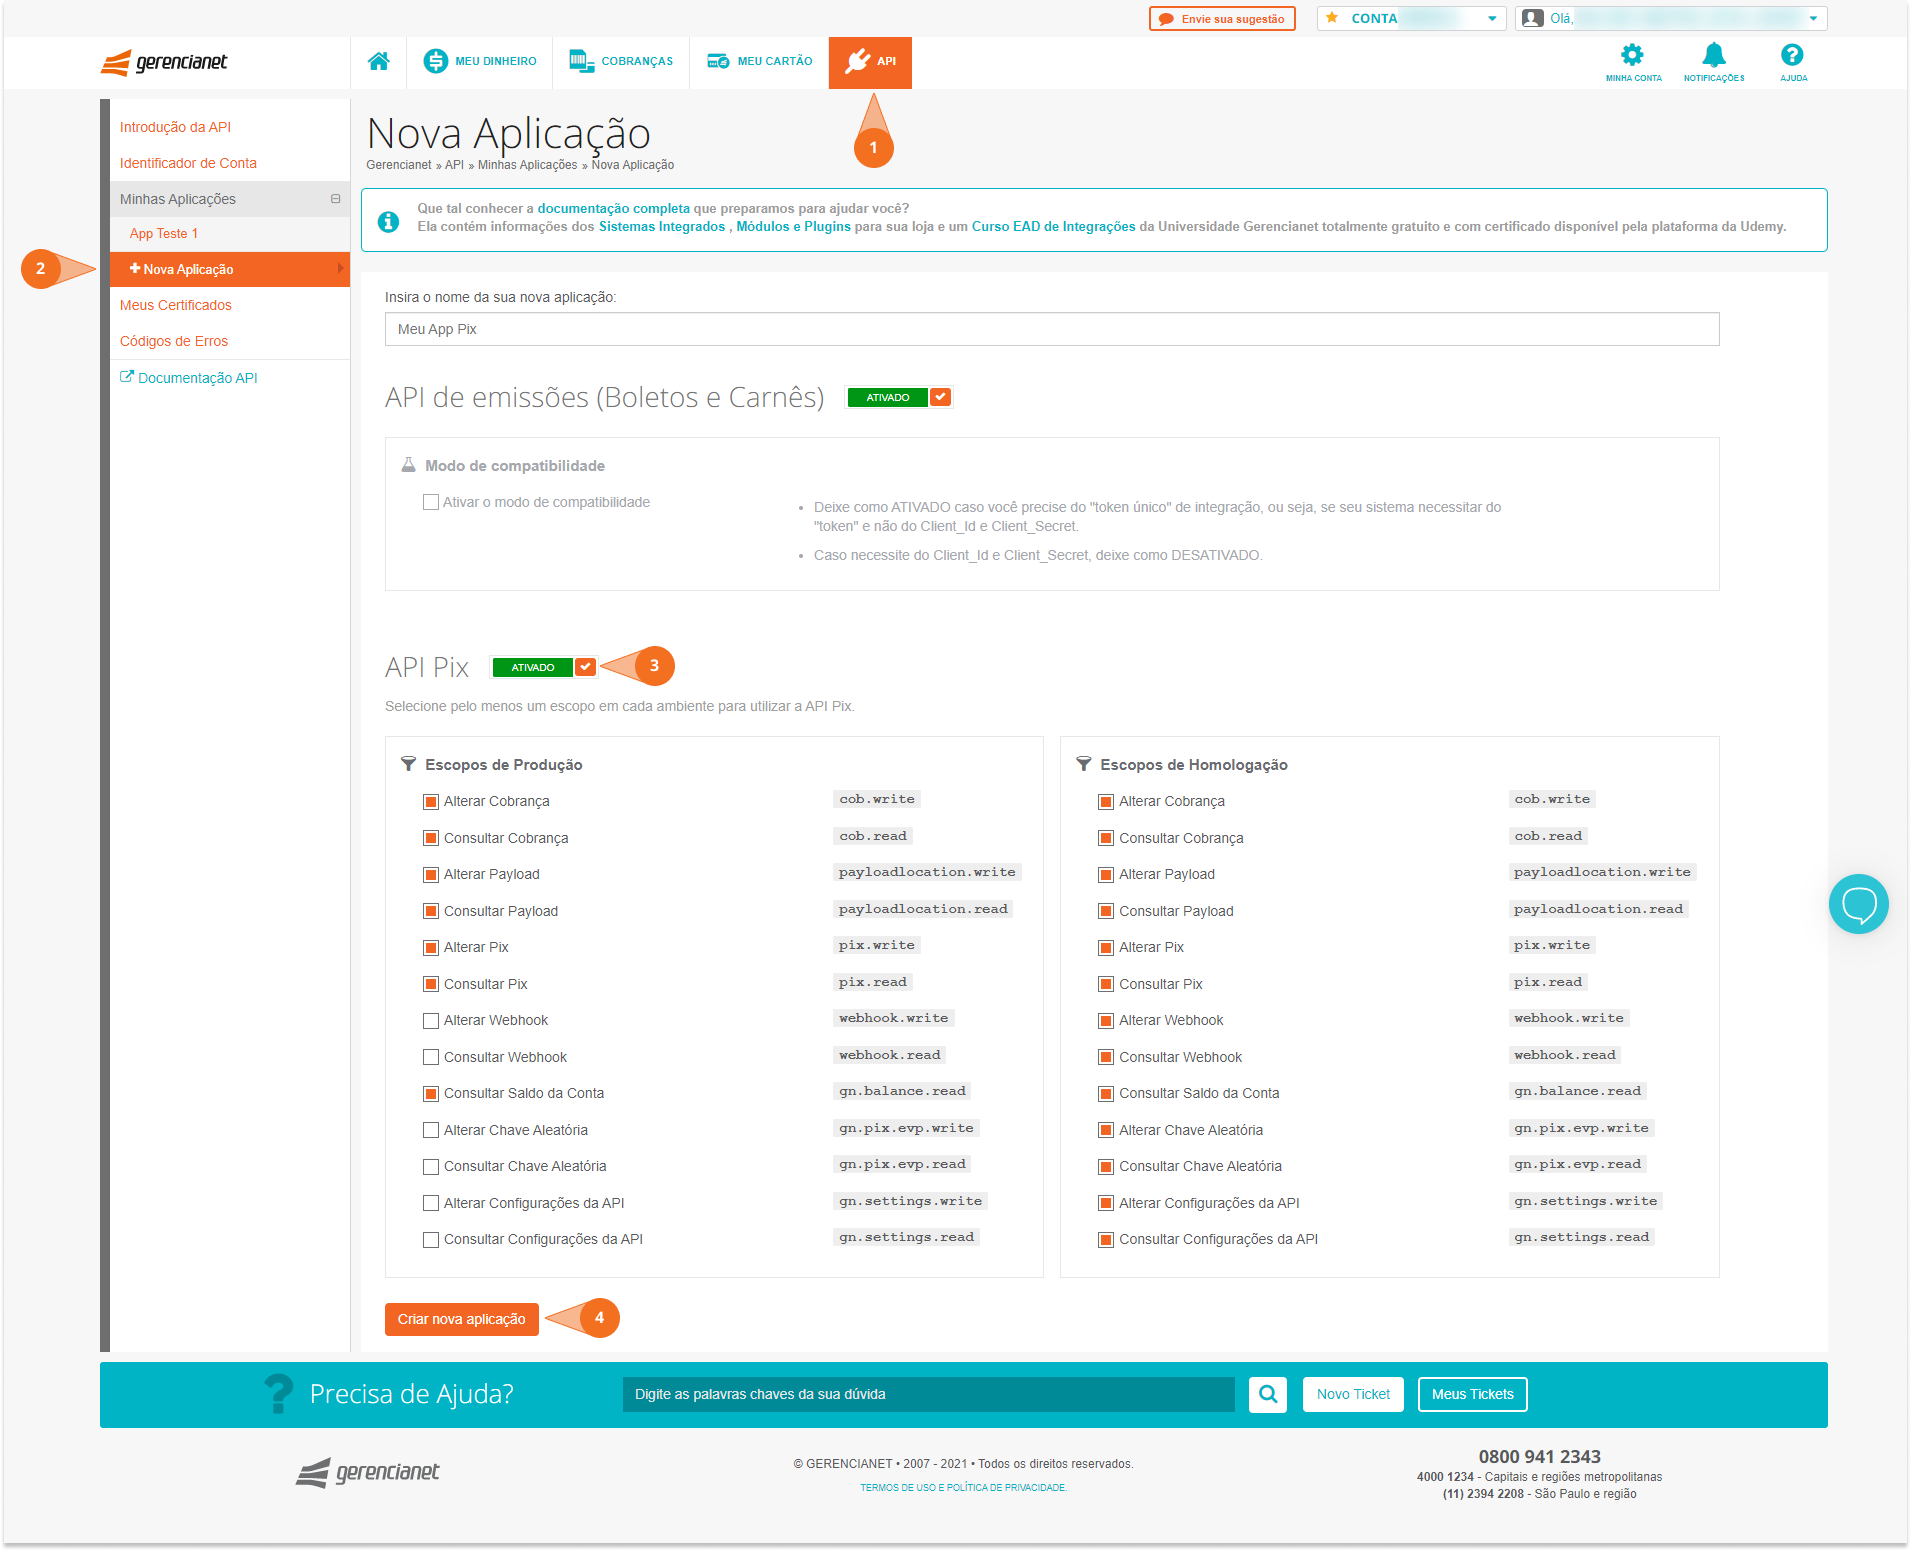
Create an application or configure an existing one
See how to create an application or take advantage of an existing application to integrate with the Gerencianet's Pix API.
- Create application
- Take advantage of an already registered application
Generating a P12 certificate
All requests must contain a security certificate that will be provided by Gerencianet within your account, in PFX(.p12) format. This requirement is fully described in the PIX security manual.
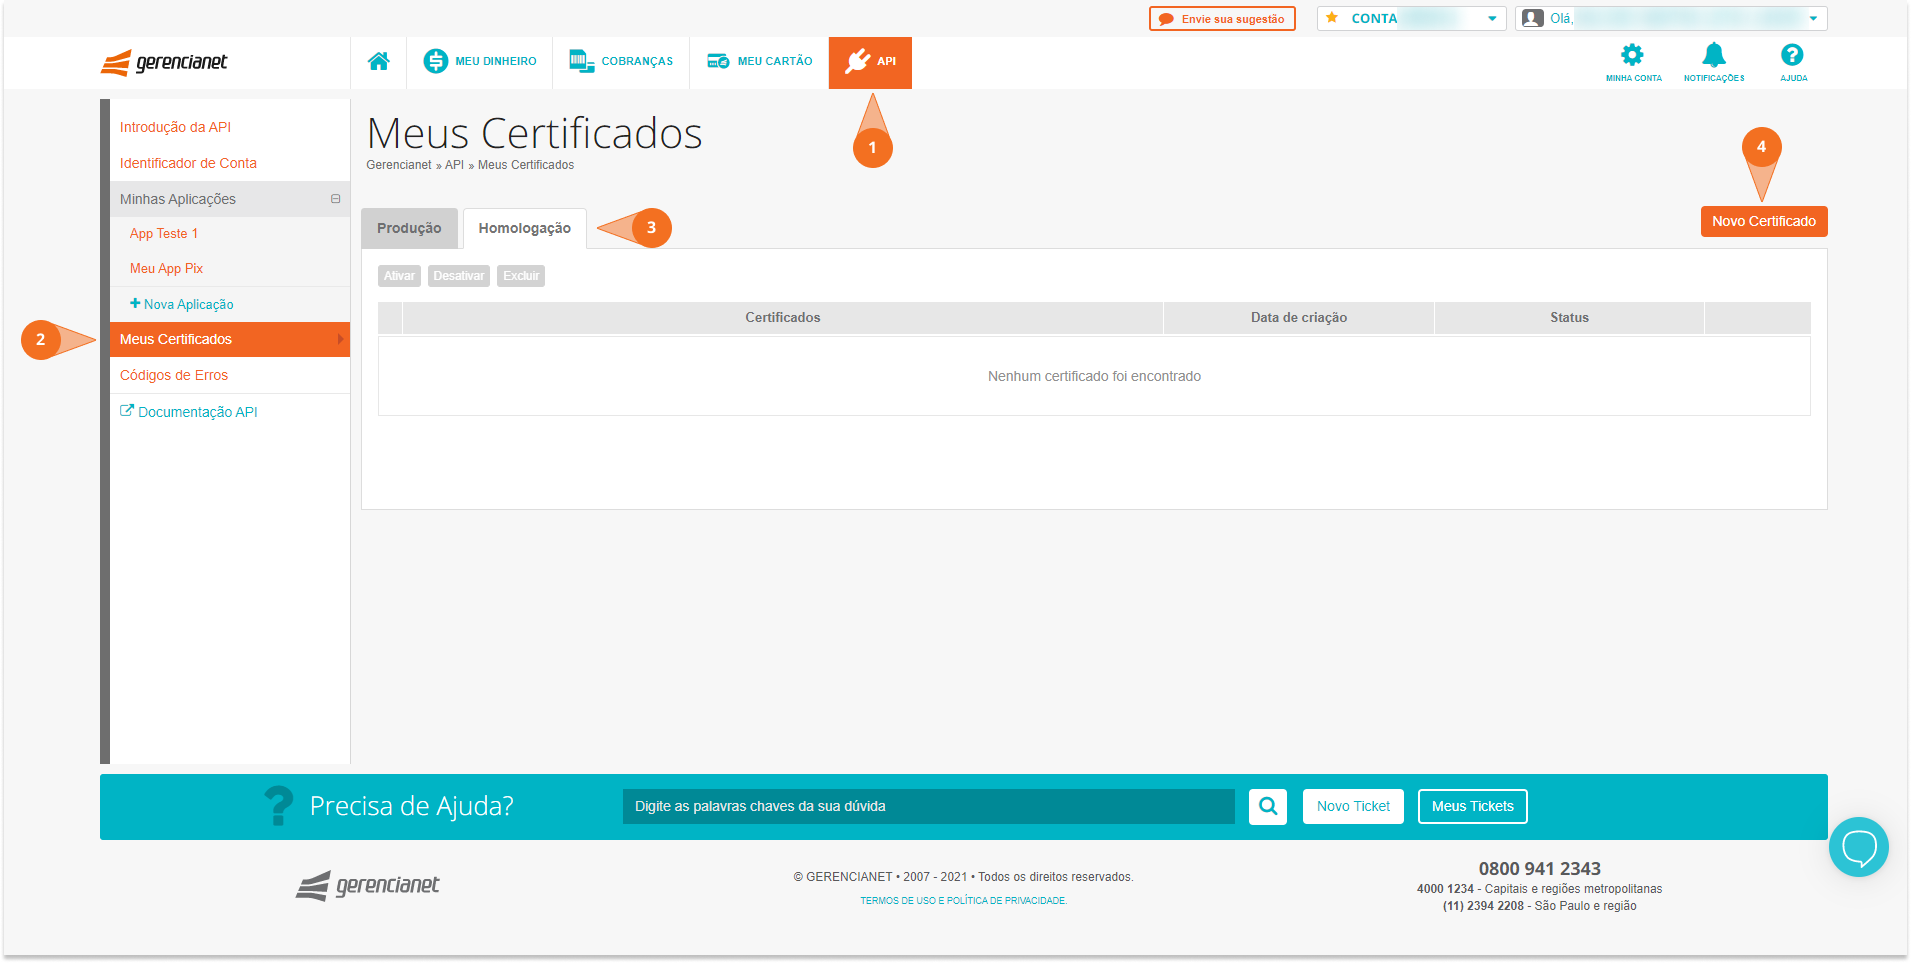
To generate your certificate, just follow the steps below:
- Access the item "API" in the upper menu of the Gerencianet account;
- In the left menu, click on "My Certificates";
- In the new window, select the environment to which the certificate will belong (Production or Homologation)
- Click on "New Certificate" (orange button);
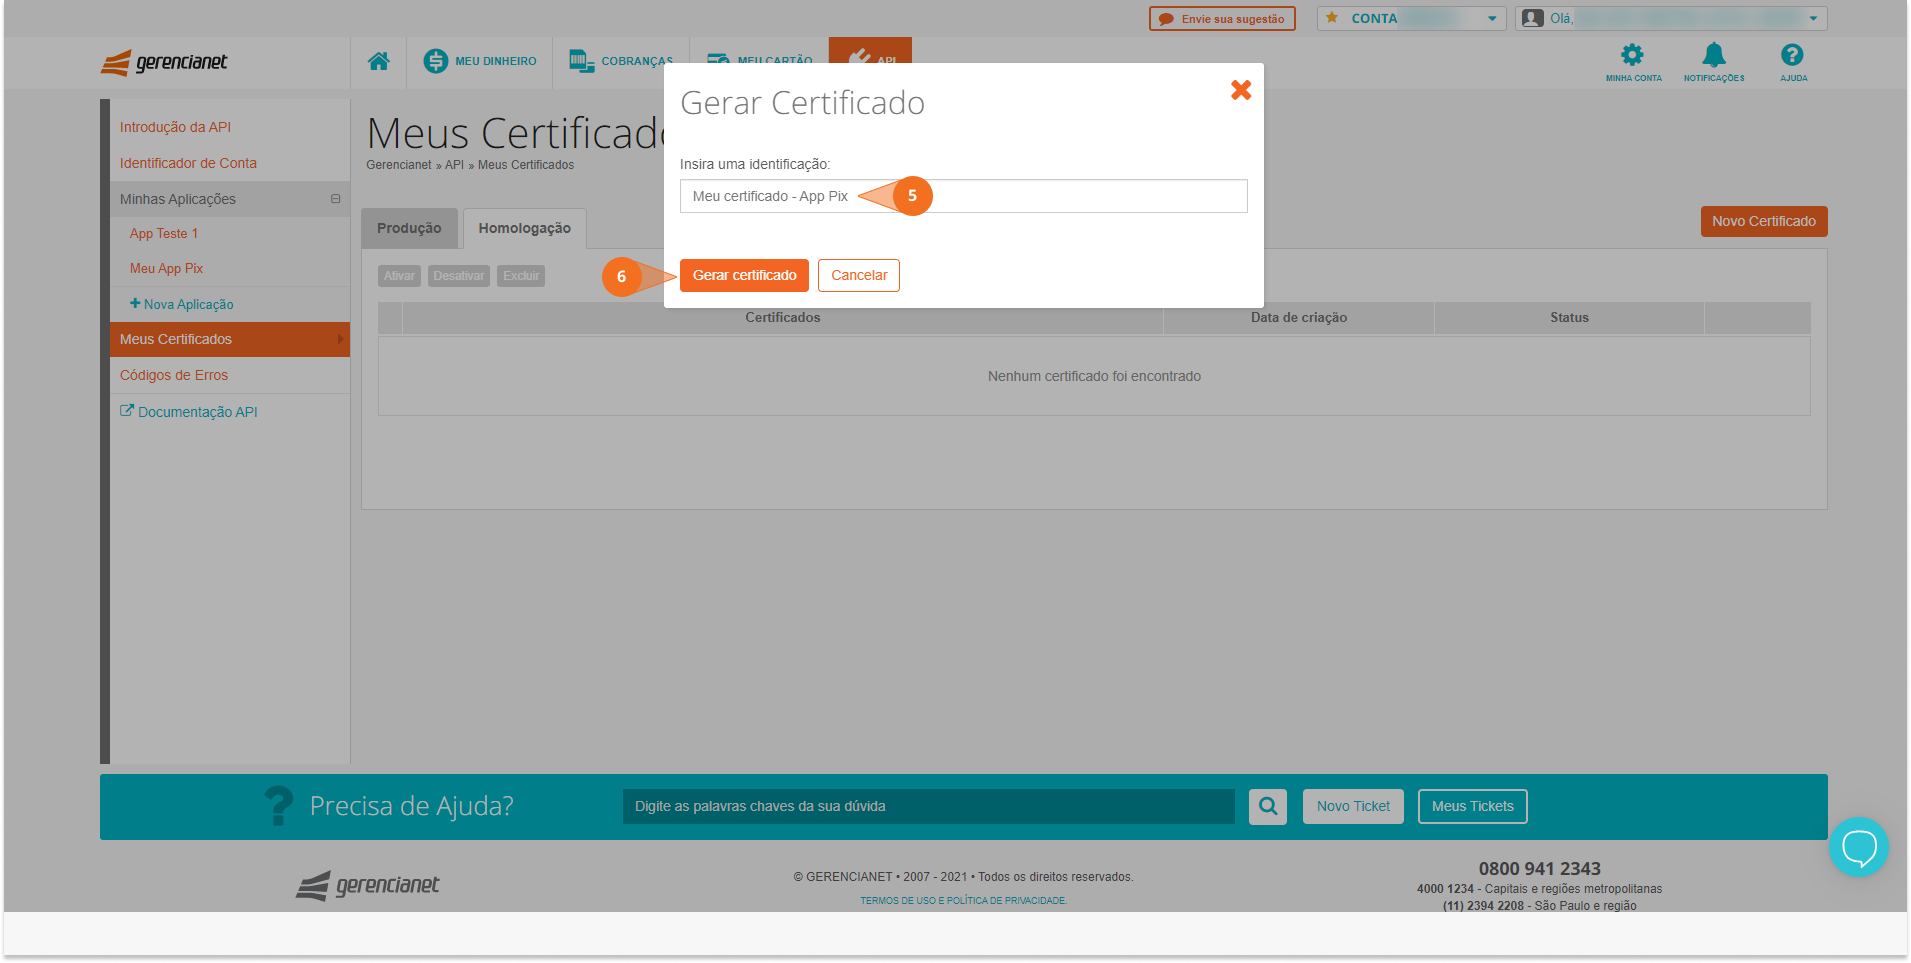
- Assign a description to the certificate to identify it in the future;
- Confirm the creation of the certificate;
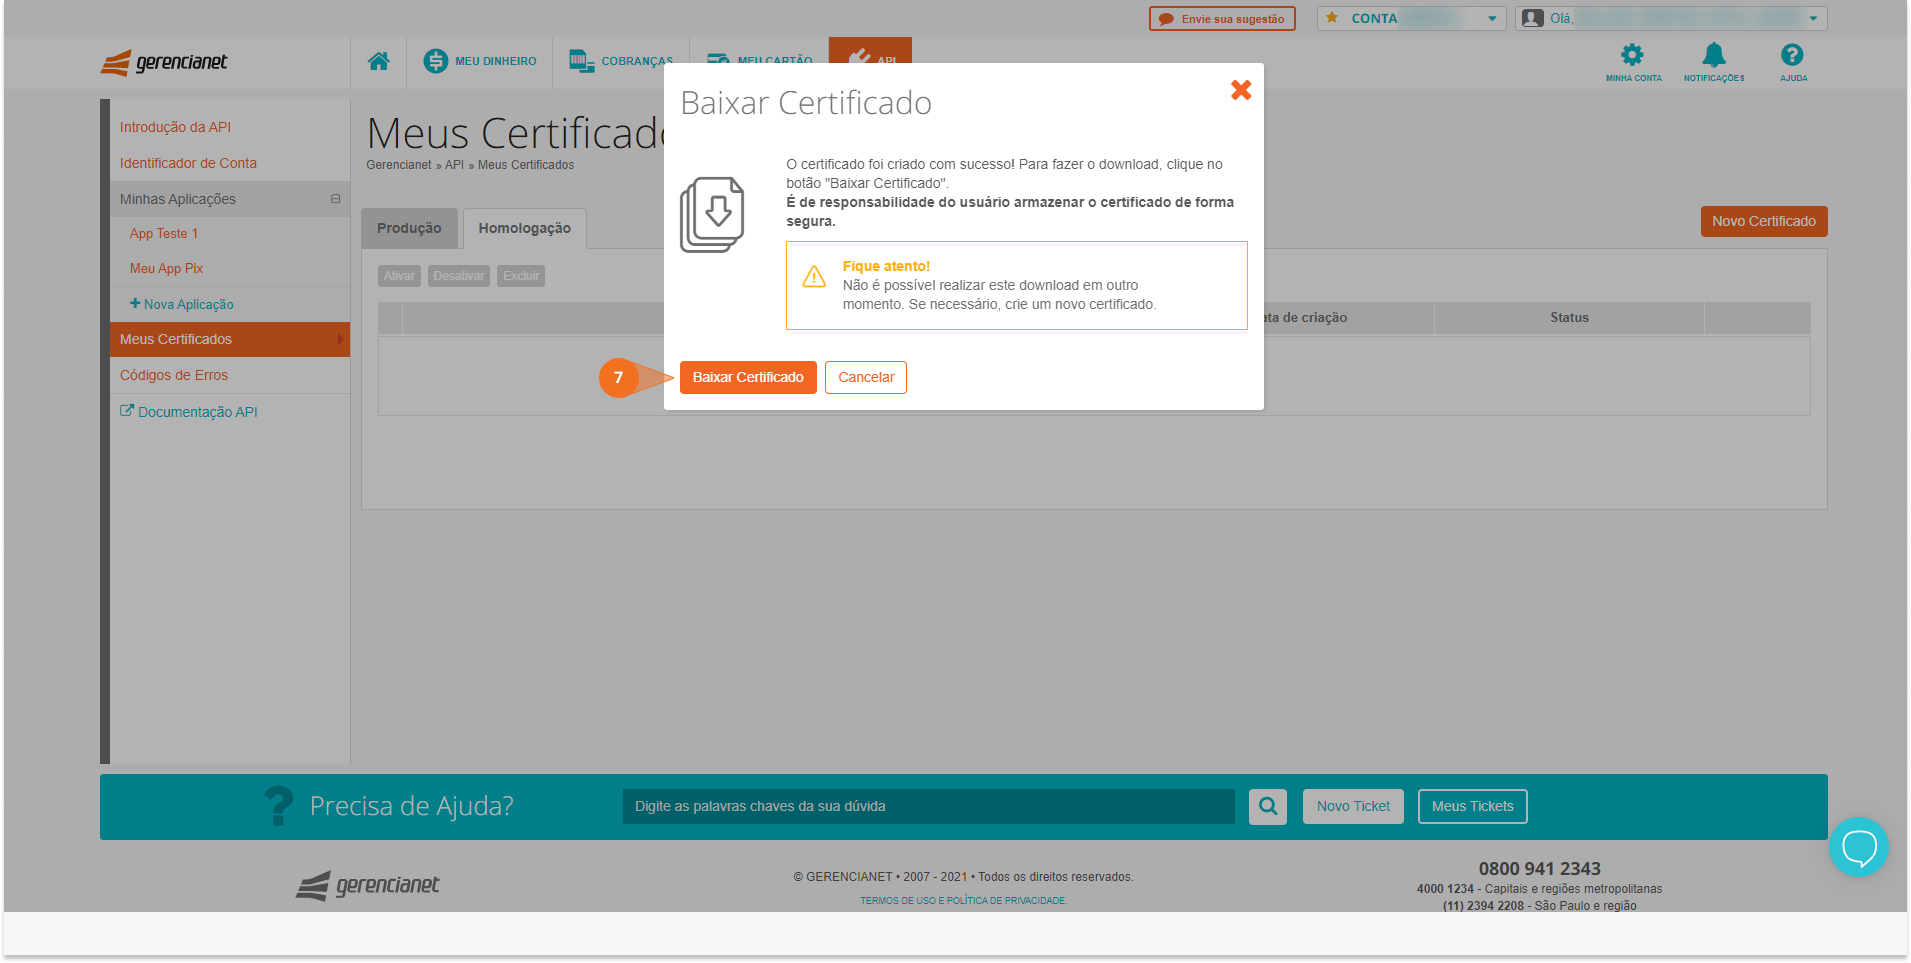
- Finally, download the certificate.
The steps for creating a certificate are illustrated in the image below.
caution
The certificate is downloaded immediately after its creation. You will not be able to download the same certificate at another time, so please store it in a safe place on your computer.
It is noteworthy that the same certificate can be used by several applications of your digital account. Even so, you can generate up to five certificates for each environment (Production or Homologation).
Conversion of P12 certificate to PEM format
tip
In some languages keys will need to be converted to .pem format. Use the information in this section only if this is the case for you.
EIn some programming languages you must convert the .p12 certificate to .pem format. To convert your certificate, you can download the certificate converter made available by Gerencianet.
You can also use the OpenSSL command to perform this format conversion between keys:
If it is necessary to separate the private key from the certificate during conversion, use the command below, also with OpenSSL:
important
The certifcate conversion can ask for some certificate password. If this happen, you should let it empty and send.
Base routes
In this documentation you will notice references to the Base Routes or BASE URL's for Production or Homologation environments. These routes are actually the URL in which the Pix Gerencianet API is located. Thus, when we refer to endpoints, it is implied that these URL snippets also make up the final route of the resource.
Use the routes below to link your application with the production and homologation environments offered by Gerencianet.
- Homologation
- Production
Authorization with OAuth2
The authorization mechanism for requests made to the Pix Gerencianet API is compatible with OAuth 2.0 protocol. The purpose of OAuth2 is to obtain the access token (access_token). This access_token is used to authorize all calls made to the API, verifying if some particular application has permissions to consume the requested endpoint.
The request authentication is made using HTTP Basic Auth from the Client_Id and Client_Secret of the application created in your Gerencianet account.
Through this authentication, OAuth will be able to respond which authorizations has the application and, consequently, authorize or deny requests according to that information.
Caution!
The P12/PEM Certificate created in the previous steps is required in all requests made to the Pix API, including the authorization request.
Setting Postman for tests
important
The use of Postman software is optional. The next few paragraphs explain how to configure it. If you don't want to use Postman for testing, you can move on to the next topic: Get Authorization.
To proceed with the Postman configuration, you must have:
- A pair of
Client_IdandClient_Secretcredentials of an application registered in your Gerencianet account; - A P12/PEM certificate generated according to the previous steps;
- The Postman software installed on your computer (If you don't have it, clique here to download);
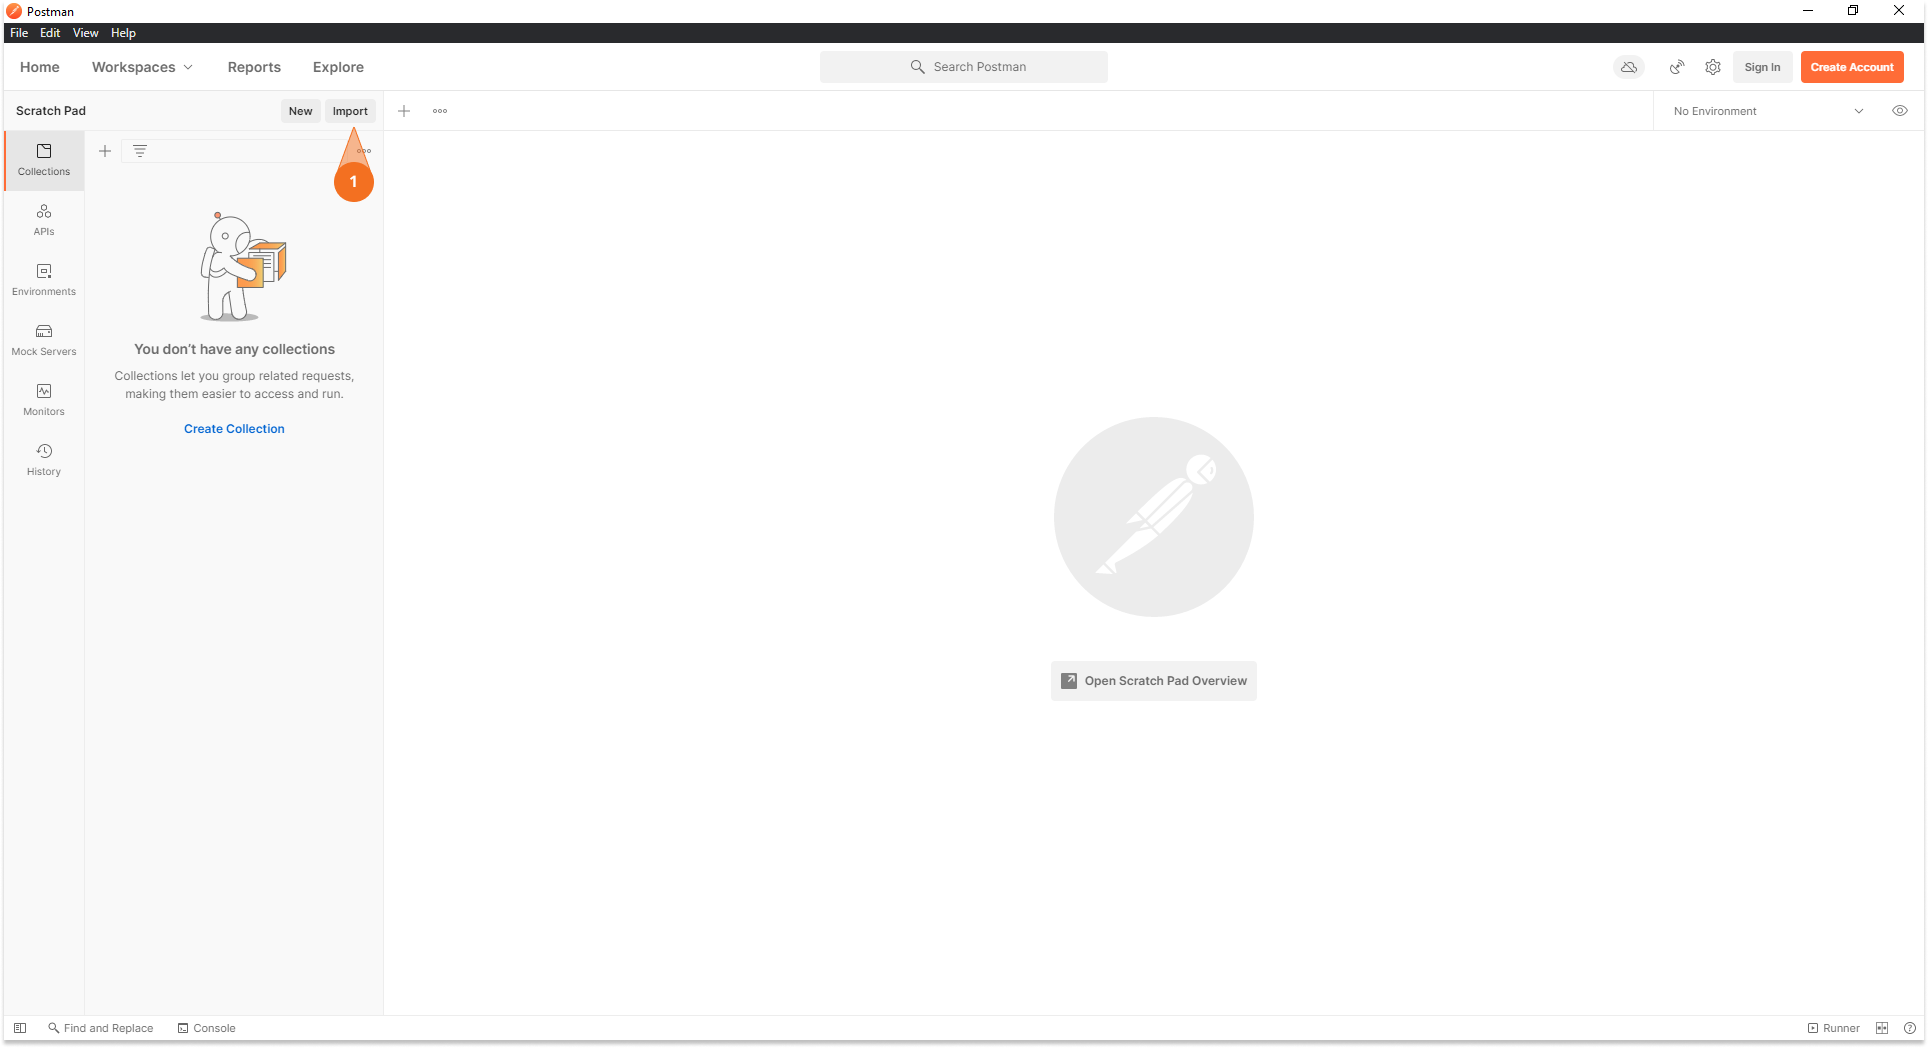
1. Importing the Pix API Collection
When you have all of the above requirements, start setting up Postman by importing the Pix Gerencianet API Collection.
- Download the JSON file from the collection clicking here;
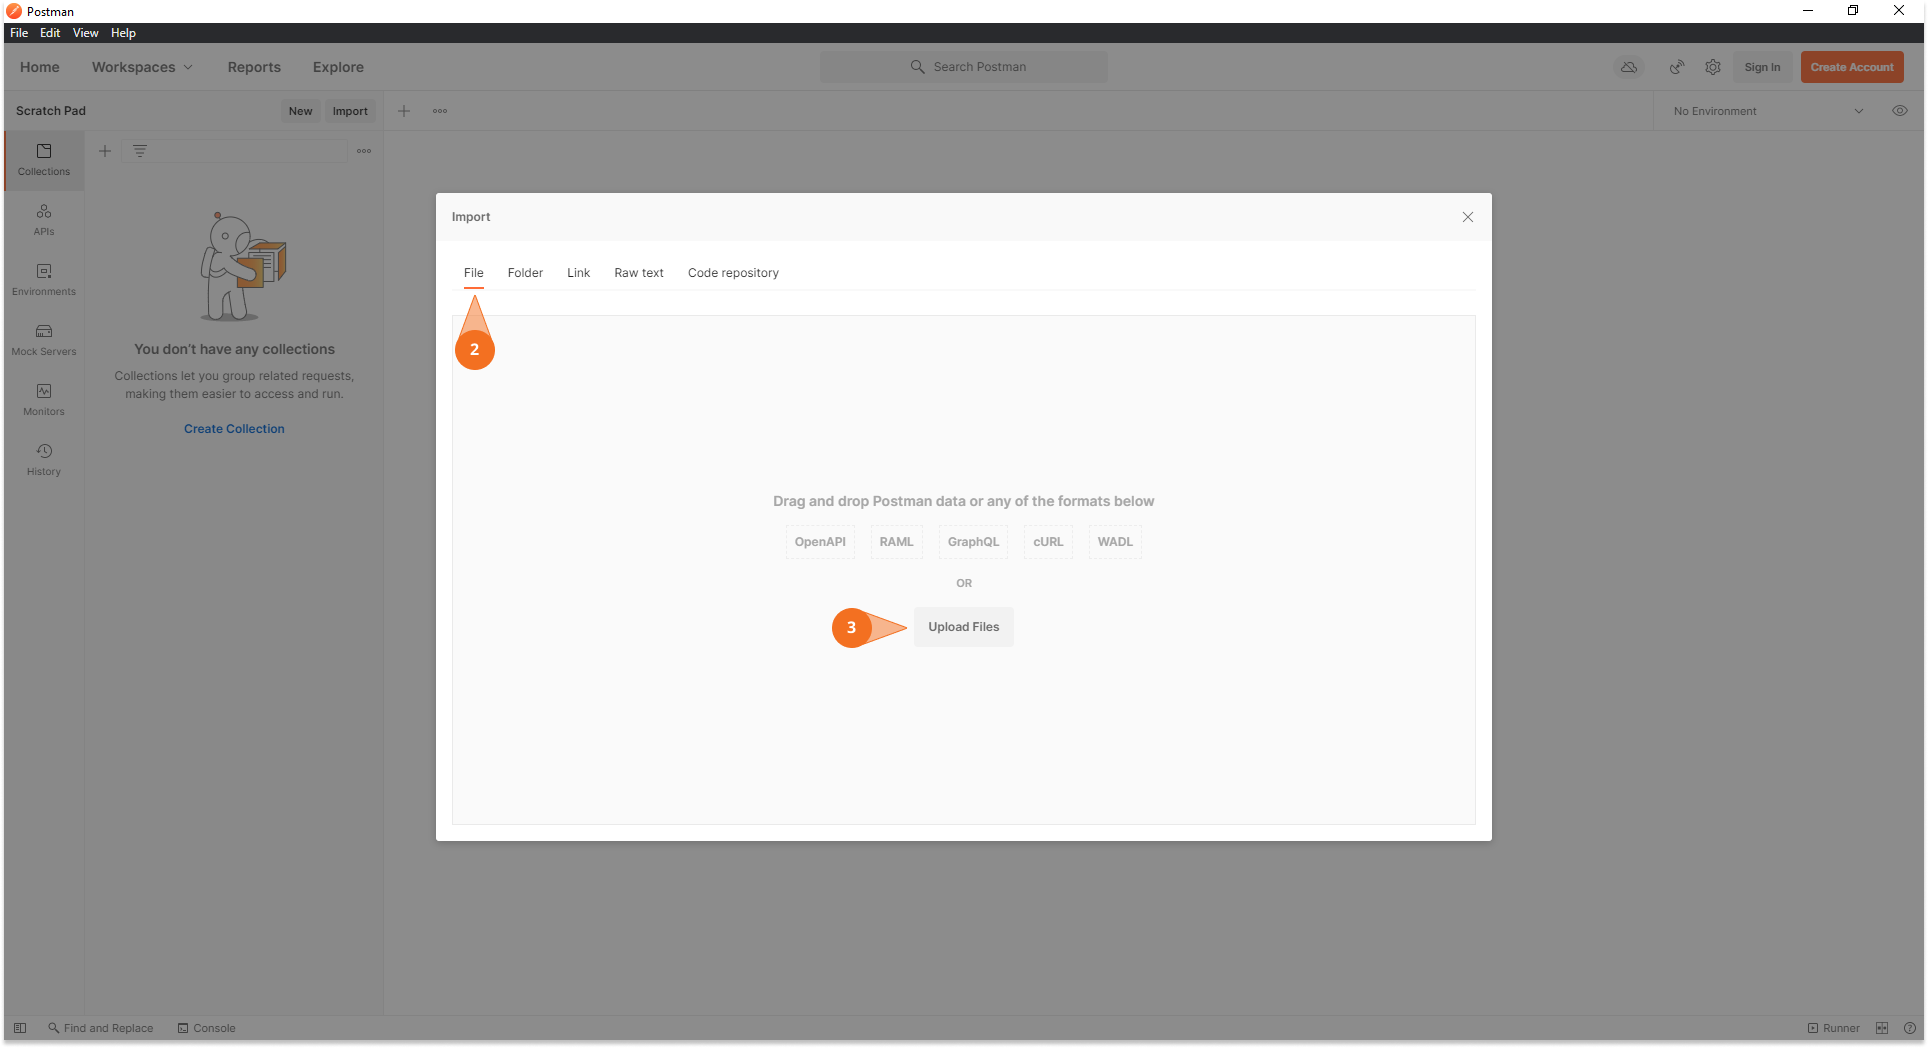
- With Postman running, use the 'Ctrl+O' shortcut to open the import screen;
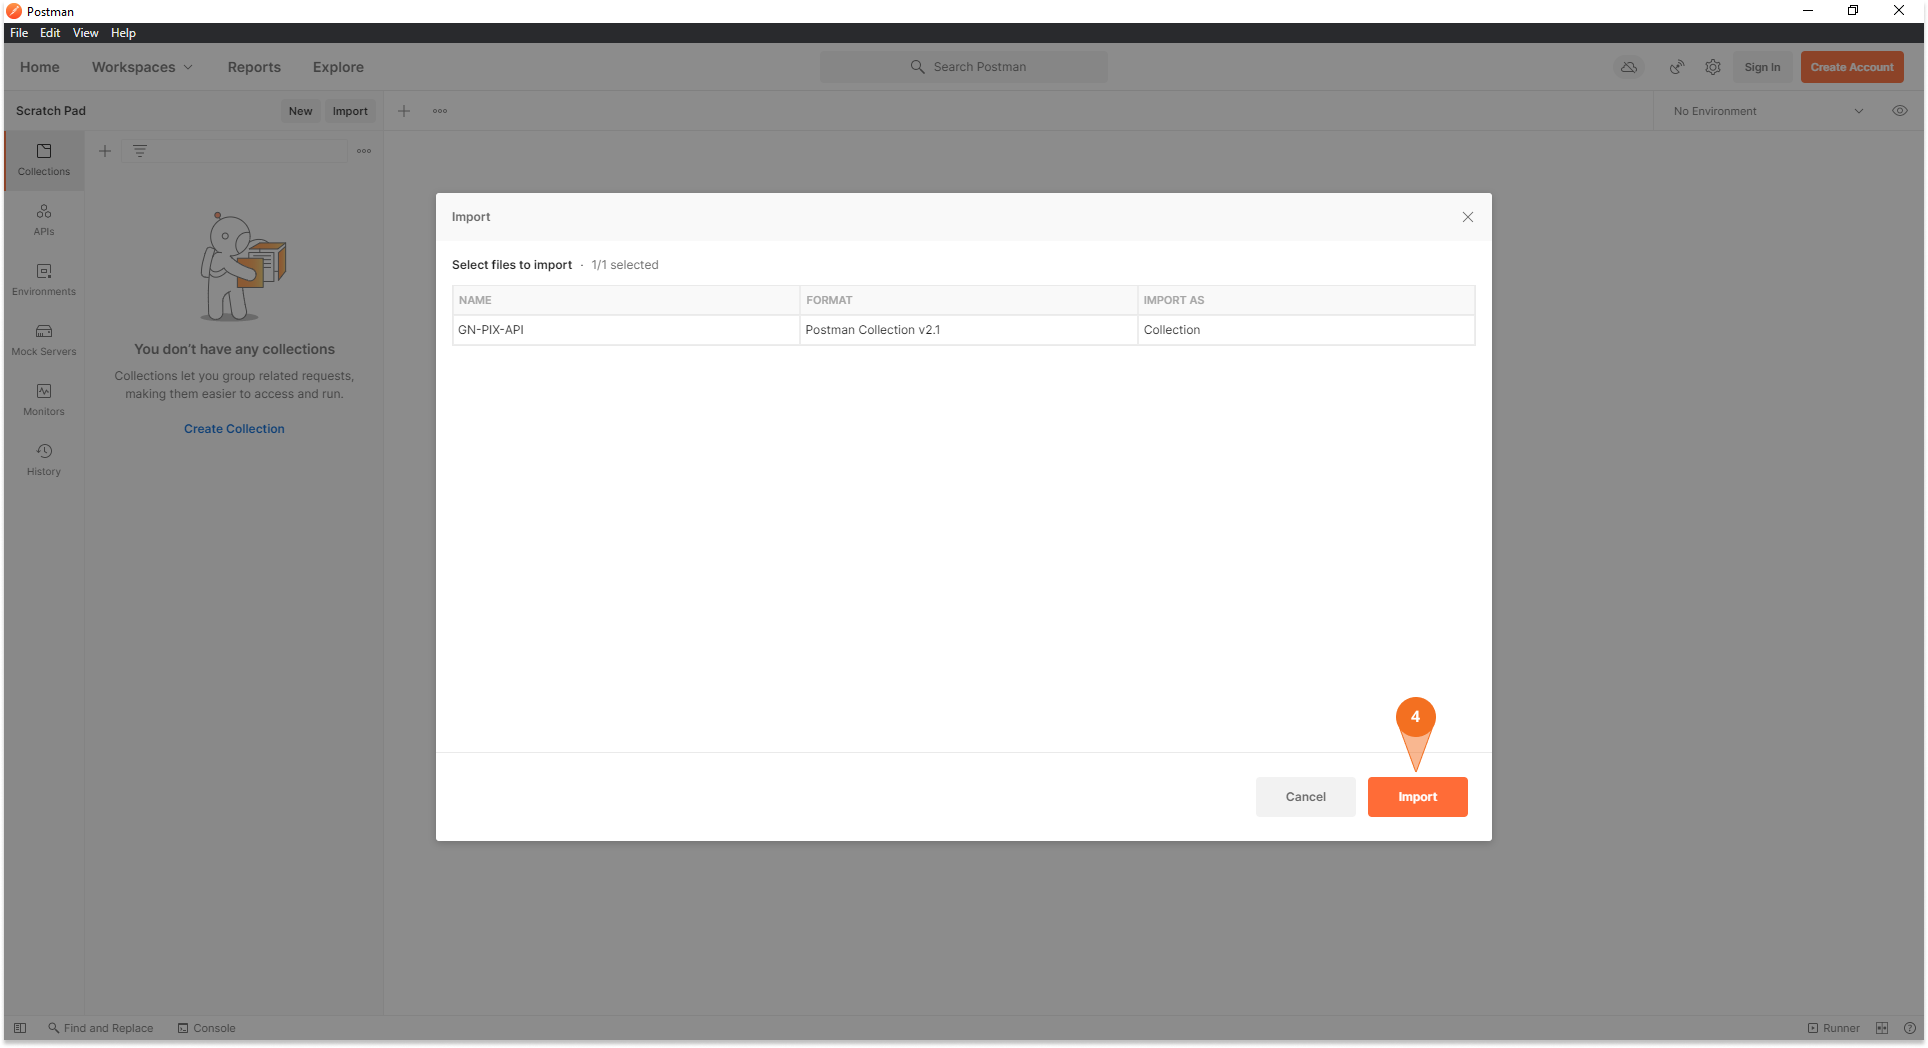
- Select Collection file;
- Click Import
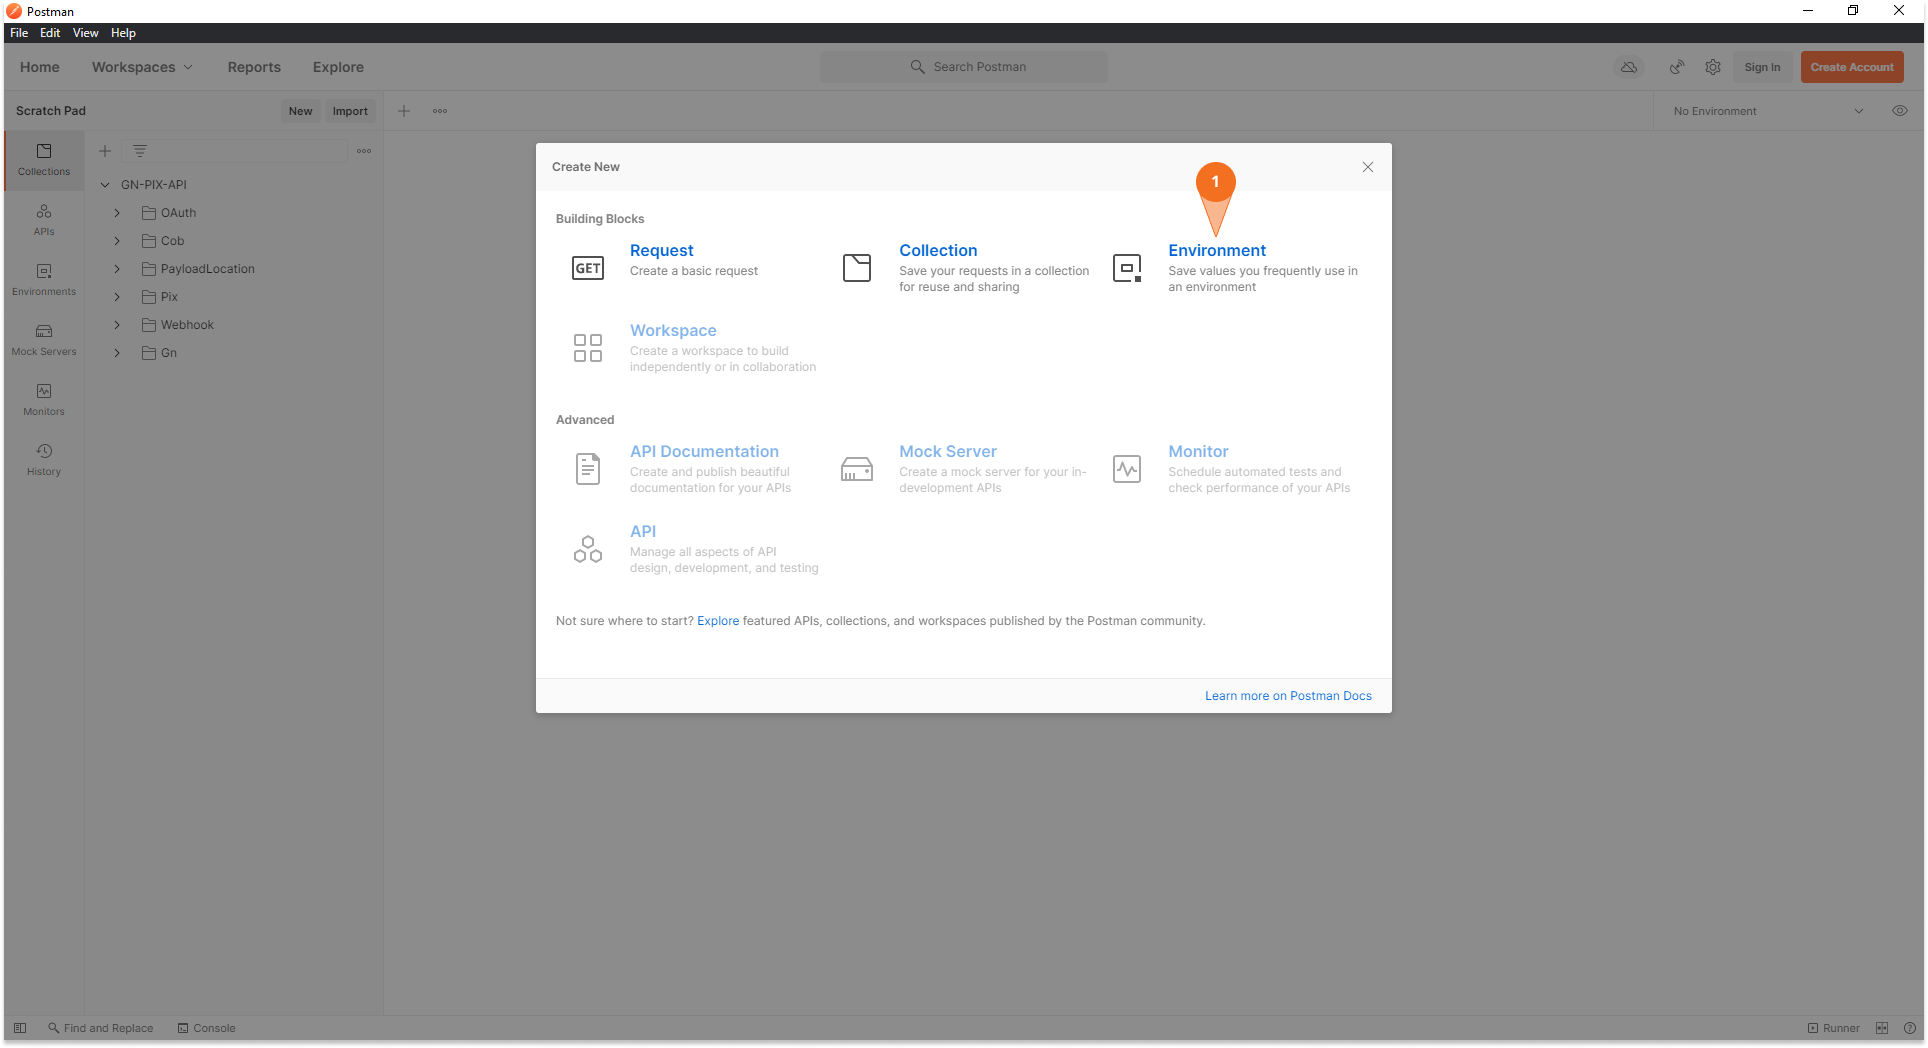
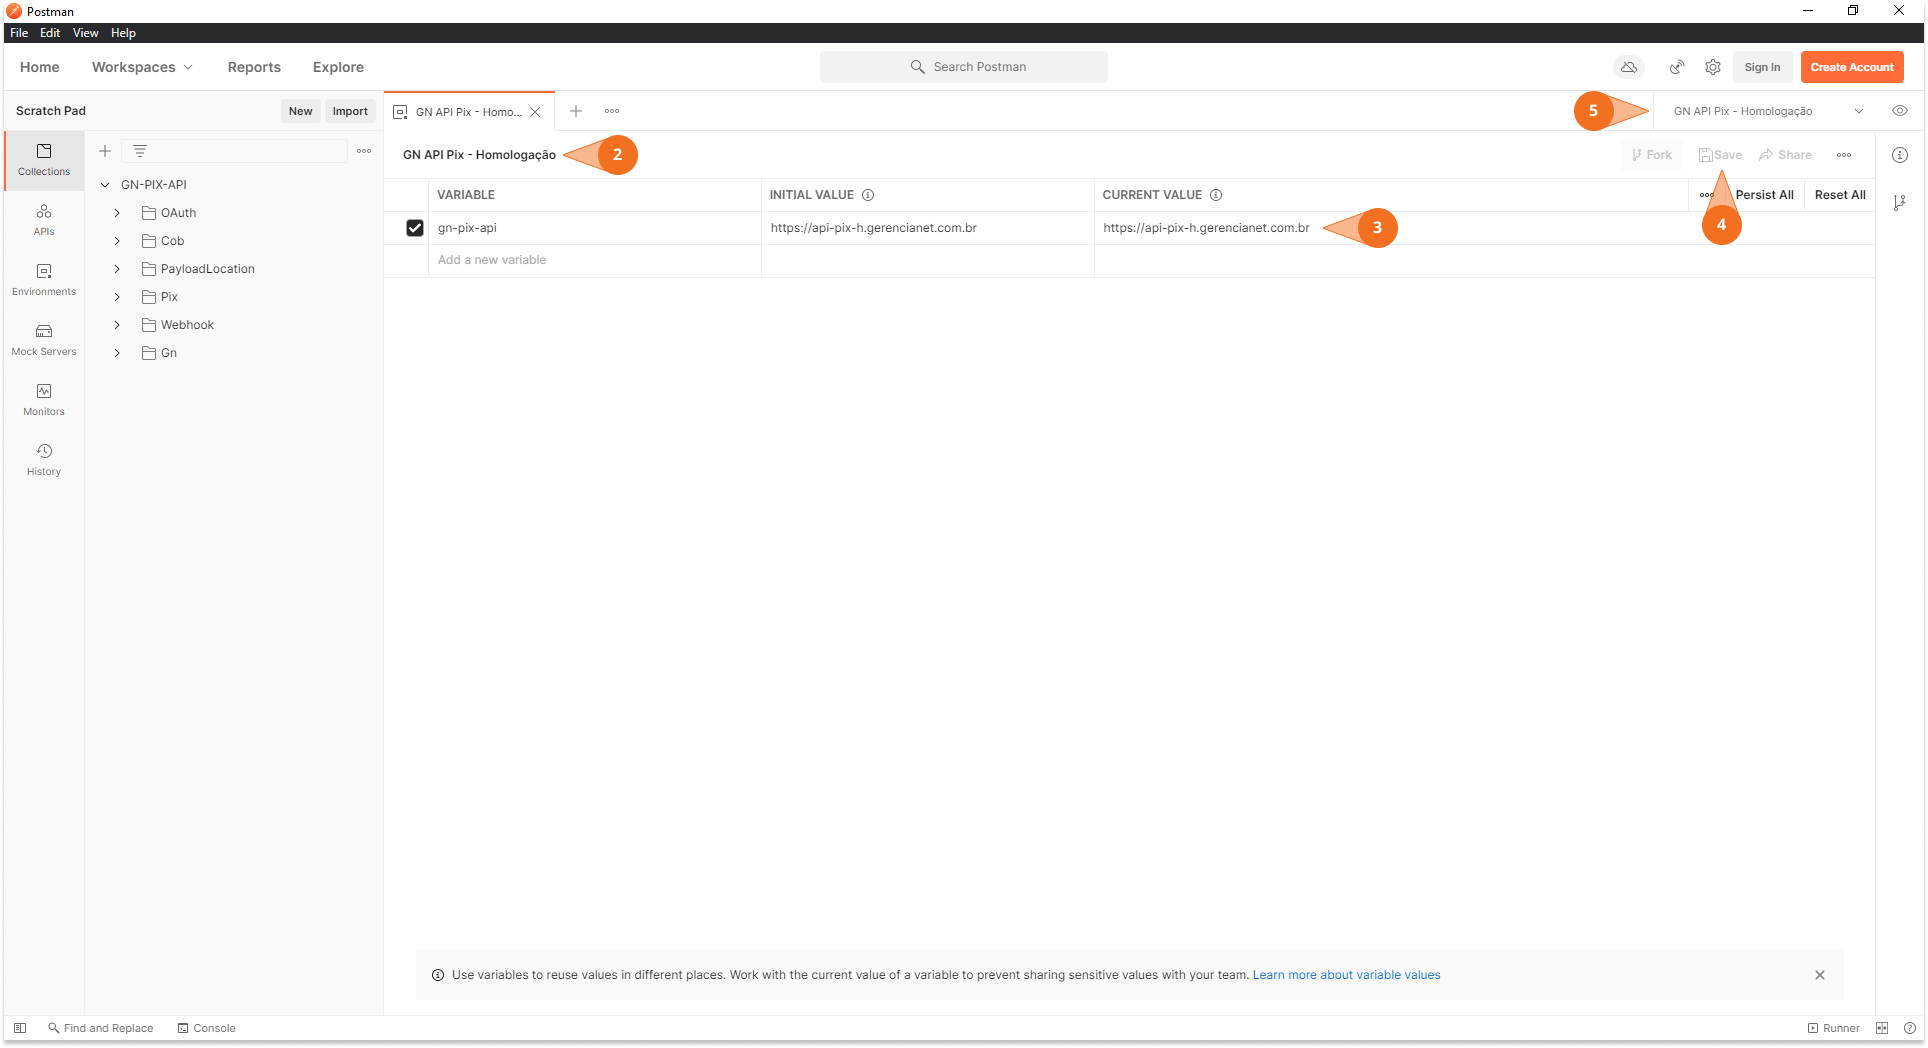
2. Creating an Environment
Creating an Environment in Postman is necessary for some automations built into the collection to work. These automations are designed to make it easier for developers during testing.
With them you need to request the authorization only once, and then the access_token is recorded as a Postman environment variable, available for use in subsequent requests.
To create an Environment follow the steps below.
- Use the
Ctrl+Nshortcut and select 'Environment'; - Give a name specifying whether this Environment will be pointed to the production or homologation environment;
- Create the variable
gn-api-pixand in initial value (Initial value) enter the URL of the Production or Homologation Pix API; - Save your Environment;
- Select the desired Environment, so Postman will understand the created variable.
The images below shows the steps above. As an example, an Environment was created for Pix Gerencianet API Homologation environment.
important
Repeat the steps above to this time have an Environment pointed to the Production environment. So you can simply switch between Environments and your requests will already be pointed correctly.
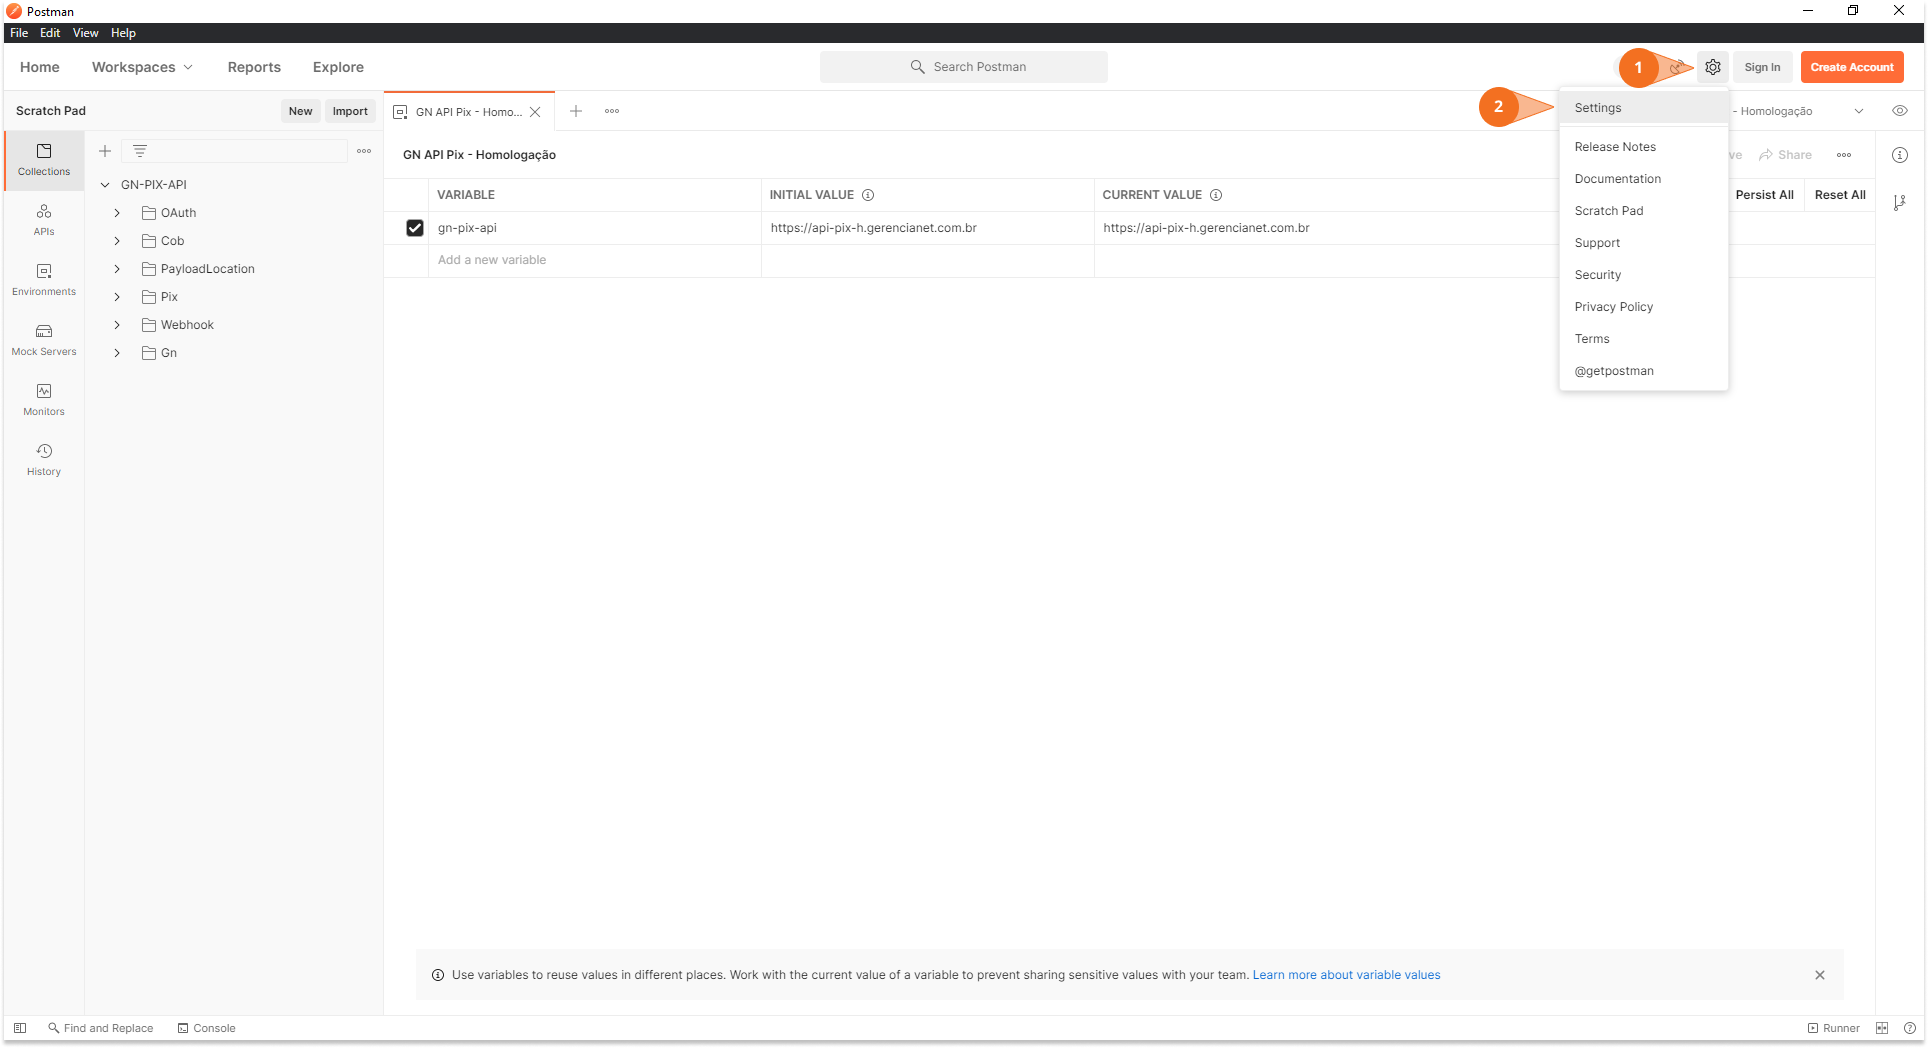
3. Setting the certificate in Postman
All requests made to the Pix Gerencianet API need the certificate generated in your Gerencianet account. Therefore, to help you testing Postman, follow the steps below to configure the certificate usage during requests automatically:
- Click the gear icon in the upper right corner of the Postman;
- Then click "Settings" to open the settings;
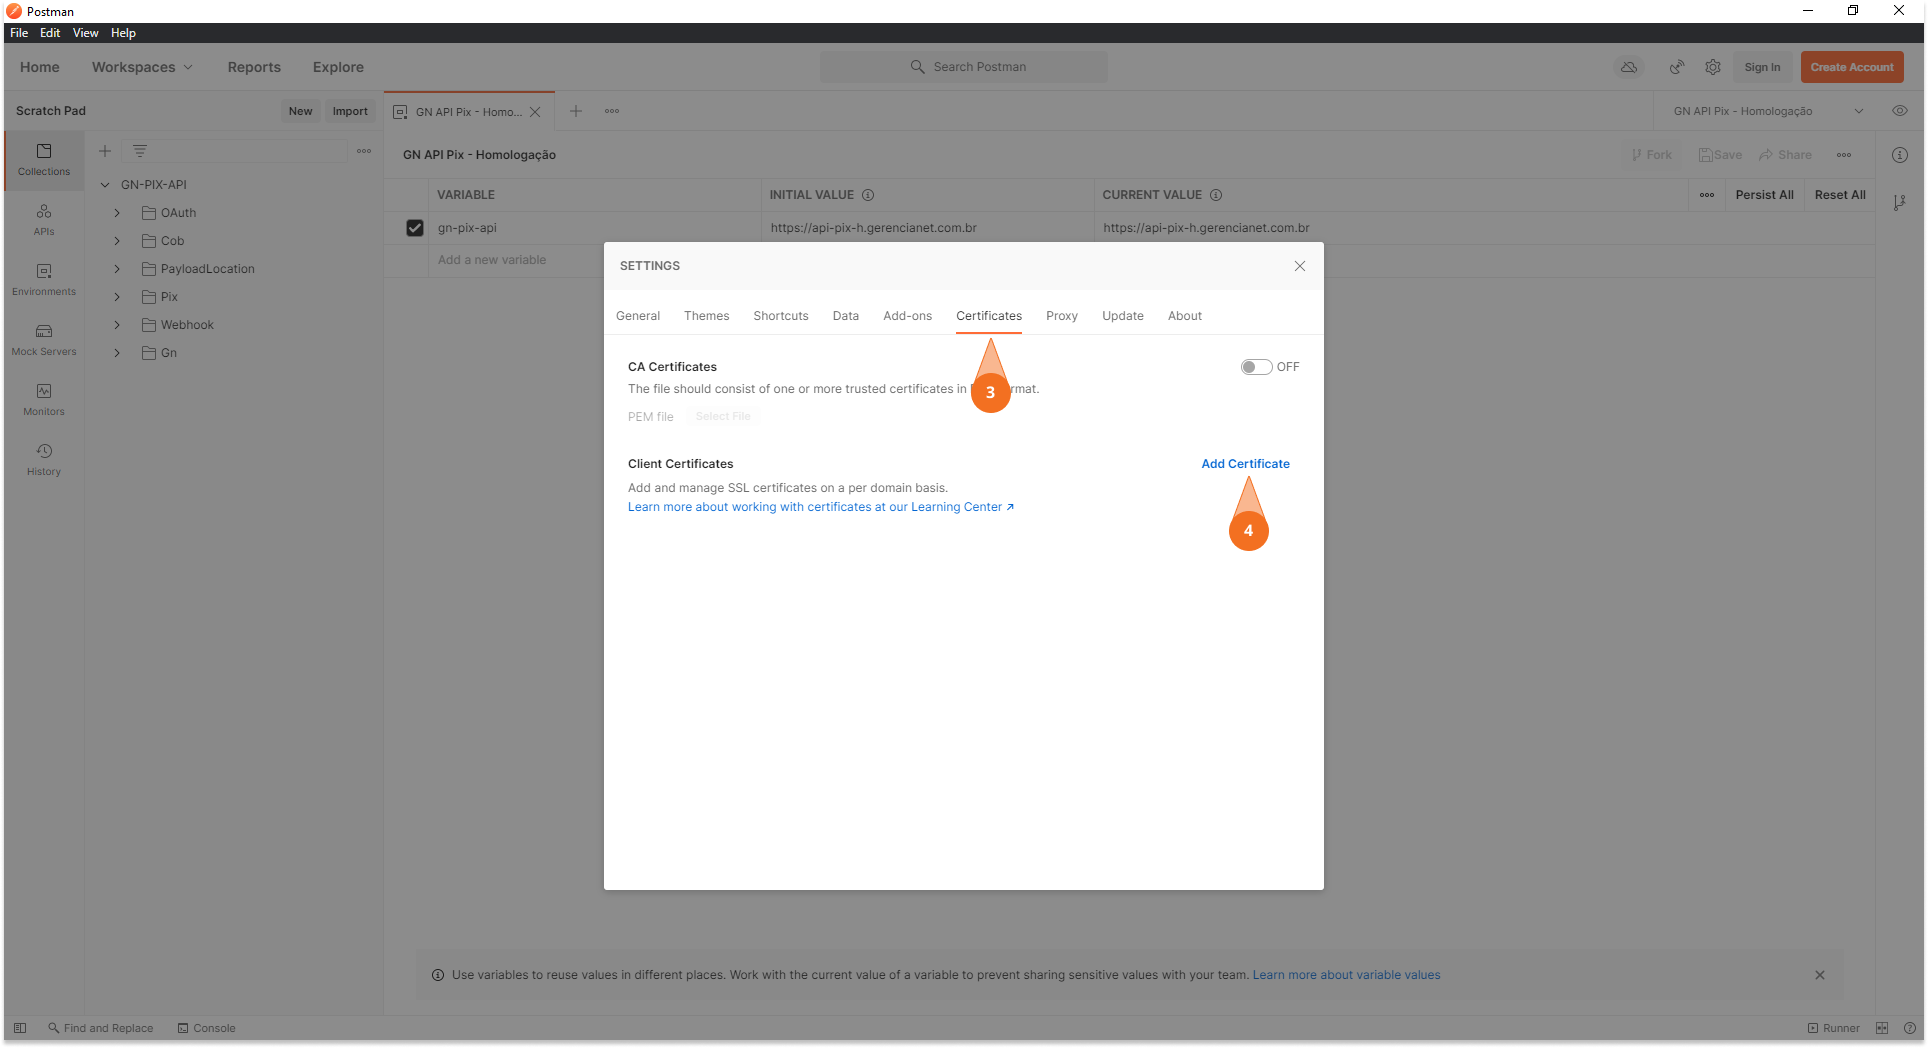
- In the top tab, click "Certificates";
- Then click on "Add Certificate";
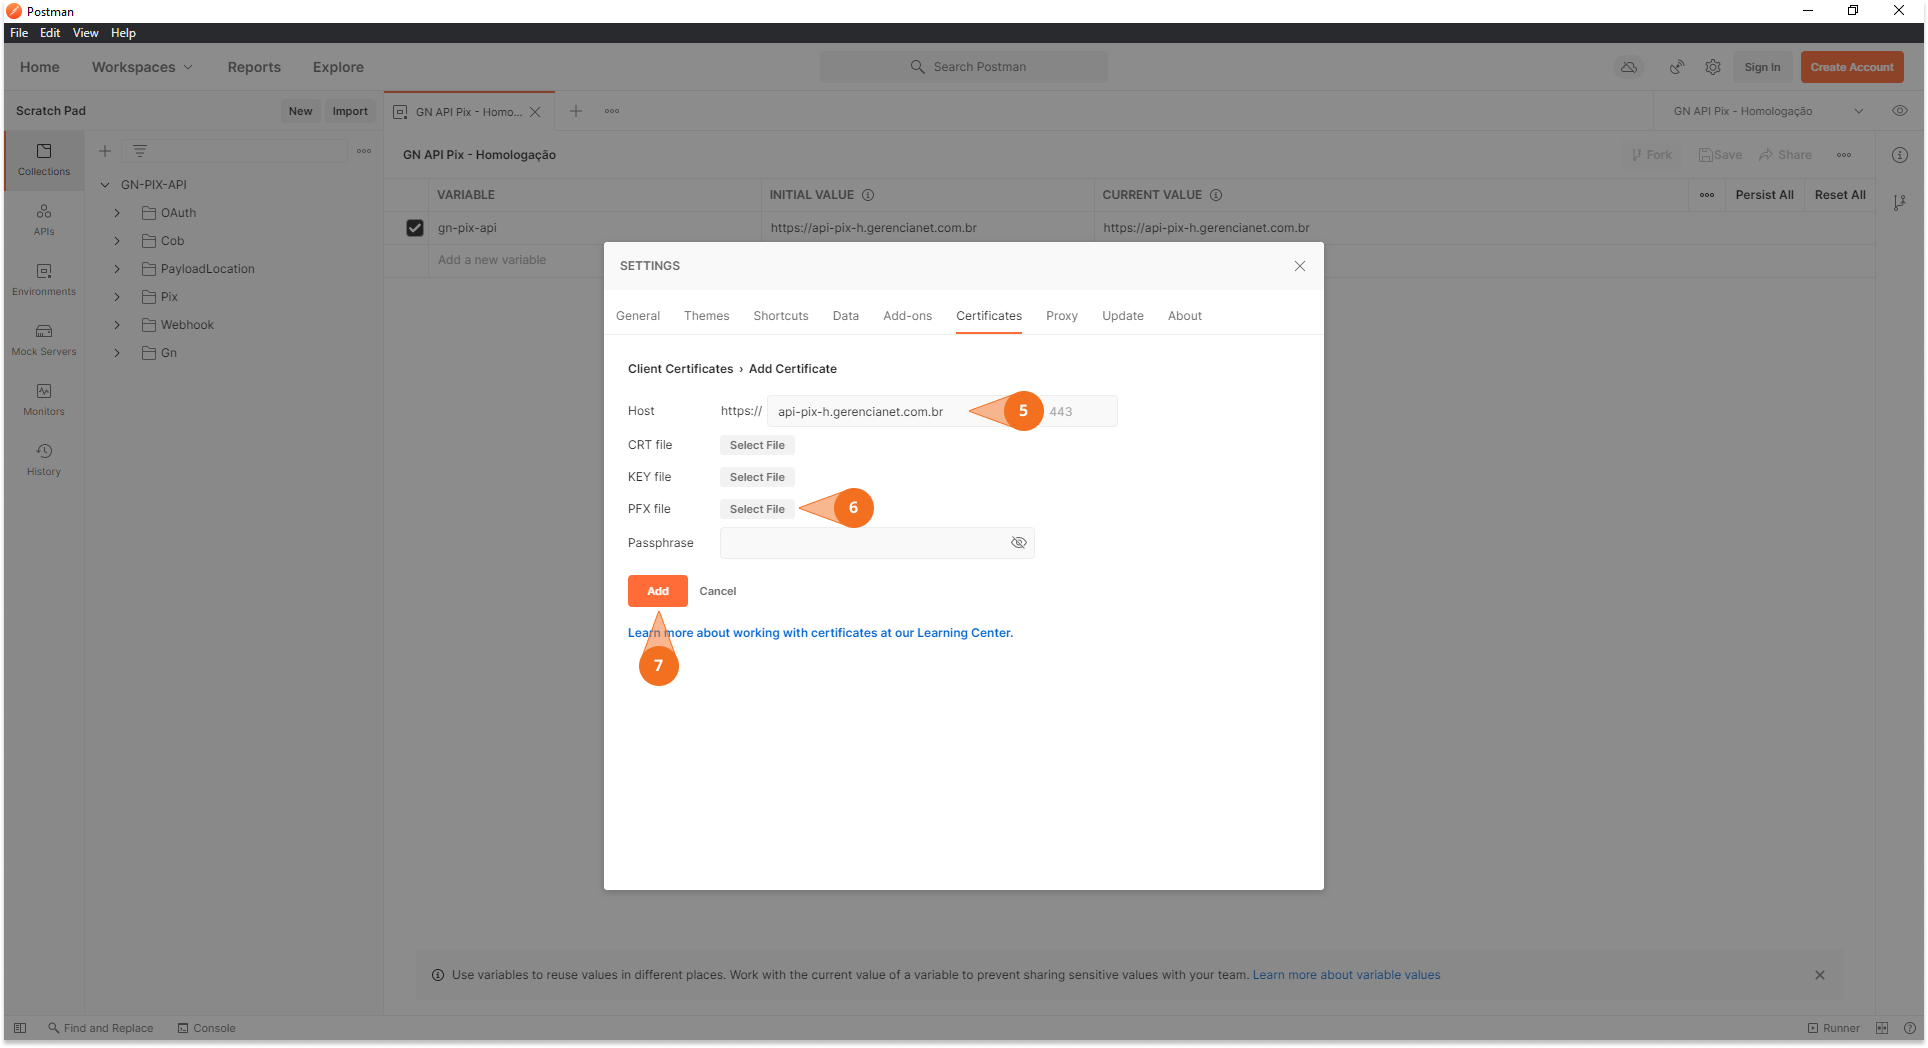
- In the configuration window of the new certificate, fill the "Host" field with the Base Route of the environment to which the certificate belongs (Production or Homologation);
- Use the "PFX File" field to tell Postman where your P12/PEM certificate file is located;
- Finish by clicking "Add" to save your settings.
By following these steps, Postman will use the certificate for any requests made to the Host of the configured environment.
important
It is ideal for you to configure the certificate from the homologation environment, but you can also repeat the steps above to configure Postman with a certificate for the Production environment.
The images below illustrate the step-by-step configuration of the certificate.
4. Assigning the Client_Id and Client_Secret in Postman
To complete the configuration of your Postman it is necessary to configure the credentials of an application of your Gerencianet account. These credentials are used for Basic Auth and to get the access_token from OAuth.
Follow the steps below to include the credentials and perform your first test in the Pix Gerencianet API.
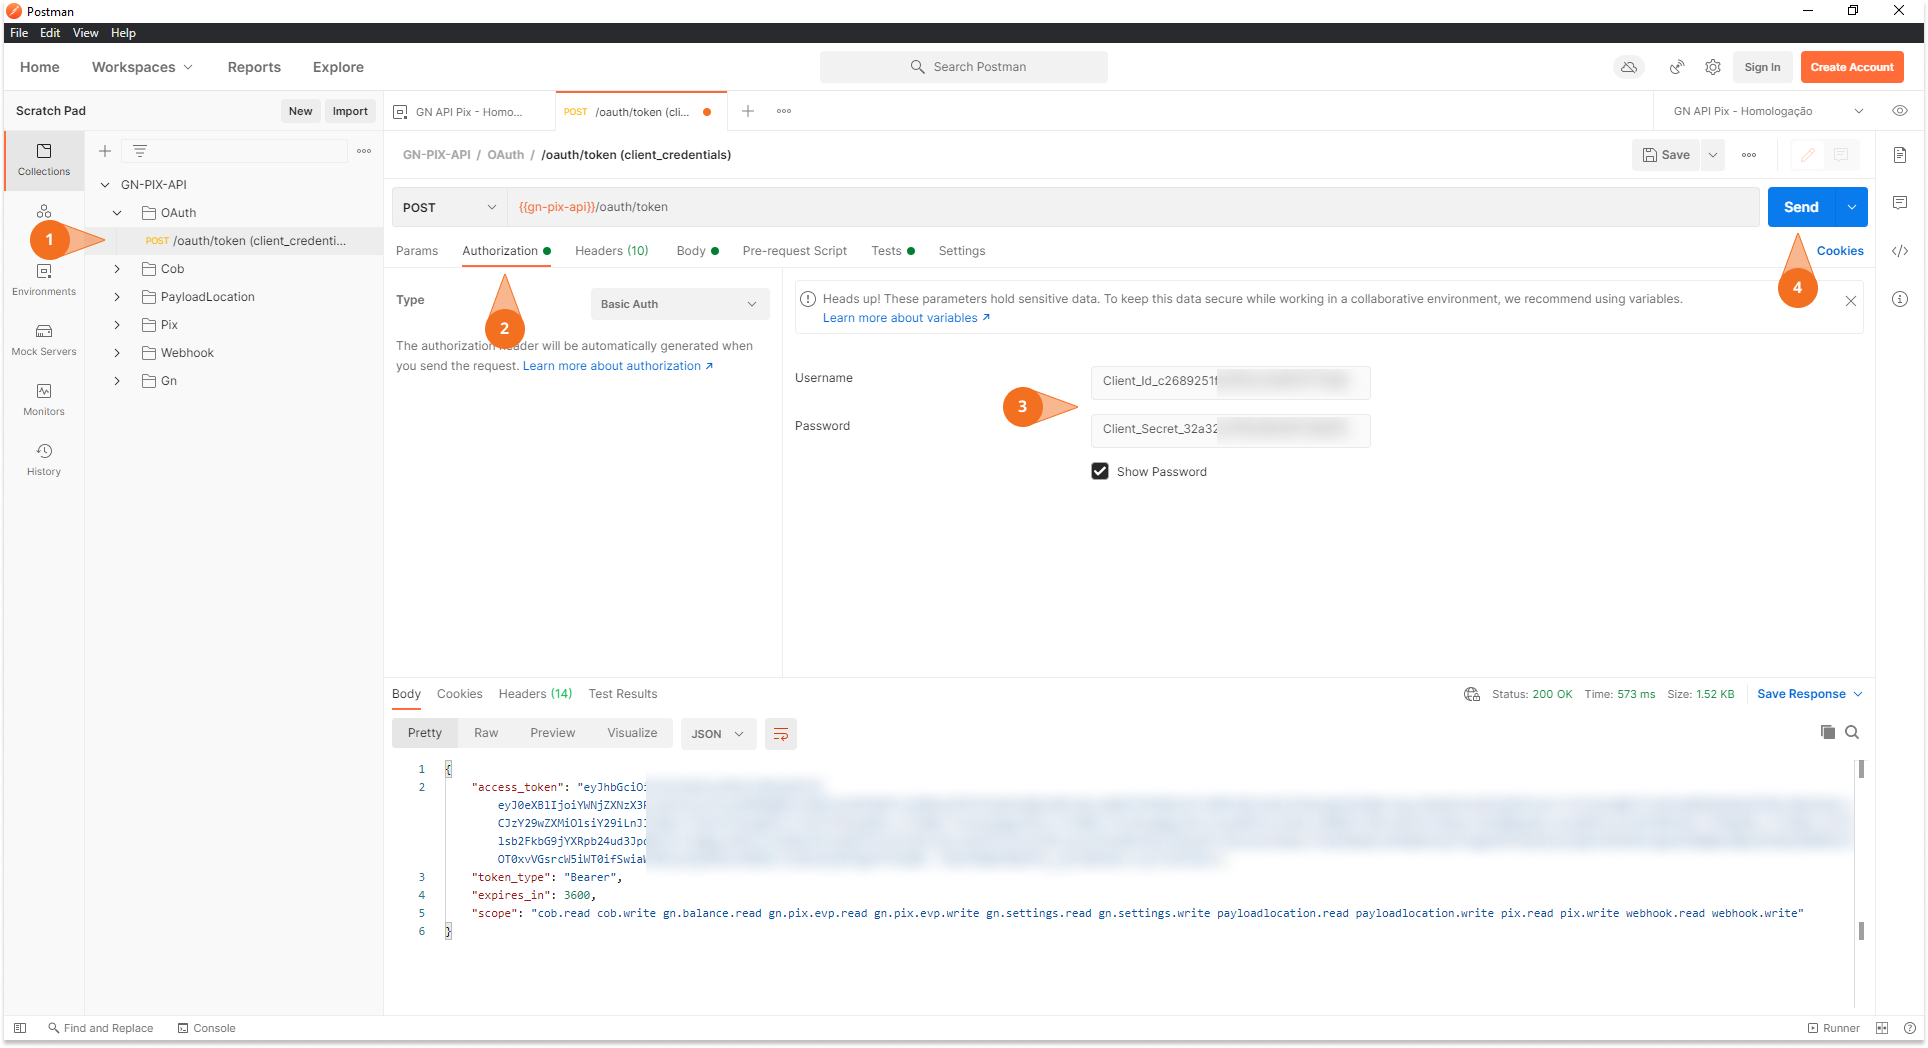
- In the imported collection, navigate to the
/oauth/tokenroute and double-click to open; - Go to the "Authorization" menu and make sure that the "Type" is selected as "Basic Auth";
- In the "username" and "password" fields fill with your application credentials, Client_Id and Client_Secret respectively;
- To test, click the "Send" button to submit the request
The image below illustrates the steps above. If everything was followed correctly, you should get a response in JSON format, containing the access_token, token_type, expires_in e scope (like the image bellow).
Obtaining the Authorization
This endpoint is used to authorize the credentials of an application and get the scopes that the application has to access the other API endpoints. The P12/PEM certificate must be in the authorization request in order to do the handshake with the API server to be allowed.
Examples of authorization using the certificate. P12
To make HTTP requests using the certificates .P12 or .PEM for Pix authorization the key must be in the request.
When using Pix it is necessary that the client and server to communicate on a verified connection with each other. The verification is done by the two-way certificate (.PEM or .P12), that is, the server and client have implemented a private key certificate and a public key certificate that allows one to ensure the identity of the other.
Therefore, to make any HTTP request to the Pix API, including the authorization request from OAuth2, it is necessary for the certificate .P12, or .PEM, to be present in the requisition headers.
There are examples of how to consume Gerencianet Pix API authorization, incorporating this certificate into the request.
- PHP
- Python
- NodeJS
- C#
- Java
- Ruby
- Go
Examples of authorization responses
The code below represents an example of OAuth's response to your authorization request.
- Response
The table below describes the attributes present in the JSON response.
| Attribute | Description | Type |
|---|---|---|
| access_token | Authorization token to be used in other api requests. | string |
| token_type | Authorization type in which the access_token should be used Padrão: "Bearer" | string |
| expires_in | Expiration time of the access_token, in seconds. Padrão: 3600 | Integer (int32) |
| scope | List of scopes to which the authorized application has access. Scopes are separated by space. | string |