
OpenCart - Boleto and credit card
Gerencianet Integration Module for OpenCart 3.x - Version 3.1.1 (BETA)
The Gerencianet module for OpenCart allows you to receive payments through the transparent checkout of our API. This module is the Official Module of Gerencianet for OpenCart, only compatible with versions of OpenCart greater than 3.0.2.0.
If you have a lower version of Opencart, check the correct version of the module to be downloaded in the table below, paying attention to your OpenCart version.
Bolix
If you have activated Bolix in your Gerencianet account, the charges generated by our module/plugin will already come with the pix on the boleto. More details about Bolix and how to activate it, click here.
1. System requirements
- PHP version:
5.4.0à7.0.3
- OpenCart needs the following PHP extensions enabled:
curldomgdxmlzip
- It is necessary that the
Real Brasileirois set as the default currency in Opencart. - OpenCart version: See table below
1.1. Gerencianet module versions for OpenCart
| Gerencianet module version | Status | Repository (branch) | Compatible OpenCart Version(*) |
|---|---|---|---|
| 0.4.1 | Sustained | ||
| Download v1 | 2.0.0.0 à 2.2.0.0 | ||
| 2.1.1 | Sustained | ||
| Download v2 | 2.x | ||
| 3.1.1 (beta) | Sustained | ||
| Download v3 | 3.0.2.0 |
IMPORTANT
(*) The system requirements were defined according to our tests. If your system doesn't fit the requirements, it doesn't mean that any of the three modules available won't work in your OpenCart, but that we don't test in the same environment.
Therefore, we do not guarantee the operation of this module in environments other than those mentioned above.
2. Pre-Installation
This step should only be followed if you have the old version of the Gerencianet/Opencart module and Opencart 3.0.x.
Uninstall the old Gerencianet module;
Delete the following files on the server where OpenCart is installed:
CAUTION
No directory should be deleted, only the files mentioned above.
3. Installation
The Gerencianet module for OpenCart can be installed in two ways:
Automatic installation: using the module installation file compressed through the OpenCart's add new extension tool;
Manual Installation: module files must be manually uploaded to the hosting server via FTP.
3.1. Automatic Installation
Download the module auto installer;
In the administration of the OpenCart store, access the menu
System > Settings(orConfigurações > Lojas) and click in the buttonEdit(orEditar). In the FTP tab, fill in your hosting's FTP access information. Pay special attention to the fieldFTP Root(orDiretório FTP), which is the full path to the root directory where your OpenCart is installed. Then click on the buttonSave(orSalvar);Access the menu
Extensions > Extension Installer(orExtensões > Instalador), click on the buttonUpload, select the filegerencianet.ocmod.zip(quoted in the first instruction) and wait for the automatic installation to complete.- If you have previously installed the Gerencianet module, OpenCart may inform you that some files will be overwritten. Don't worry, because the installation will not affect any file other than the Gerencianet module already existing in your store.
CAUTION
Due to the size of the module installation file, you may need to change the parameter php_max_upload of php.ini to at least 3 mb.
3.2. Manual Installation
Donwload the arquivos da última versão do módulo;
Unzip the downloaded files and upload the folders
admin,catalogandlibinto the main OpenCart* directory.- *If you have previously installed the Gerencianet module, OpenCart may inform you that some files will be overwritten. Don't worry, because the installation will not affect any file other than the Gerencianet module already existing in your store.
4. Settings
When accessing Extensions > Payments (or Extensões > Pagamentos), you will already see the Gerencianet module available in the list. Click in Install to install the module and then in edit to start the configuration.
Three tabs will be available to configure the module:
- General Settings
- Credentials
- Purchase Status
Tab "General Settings"
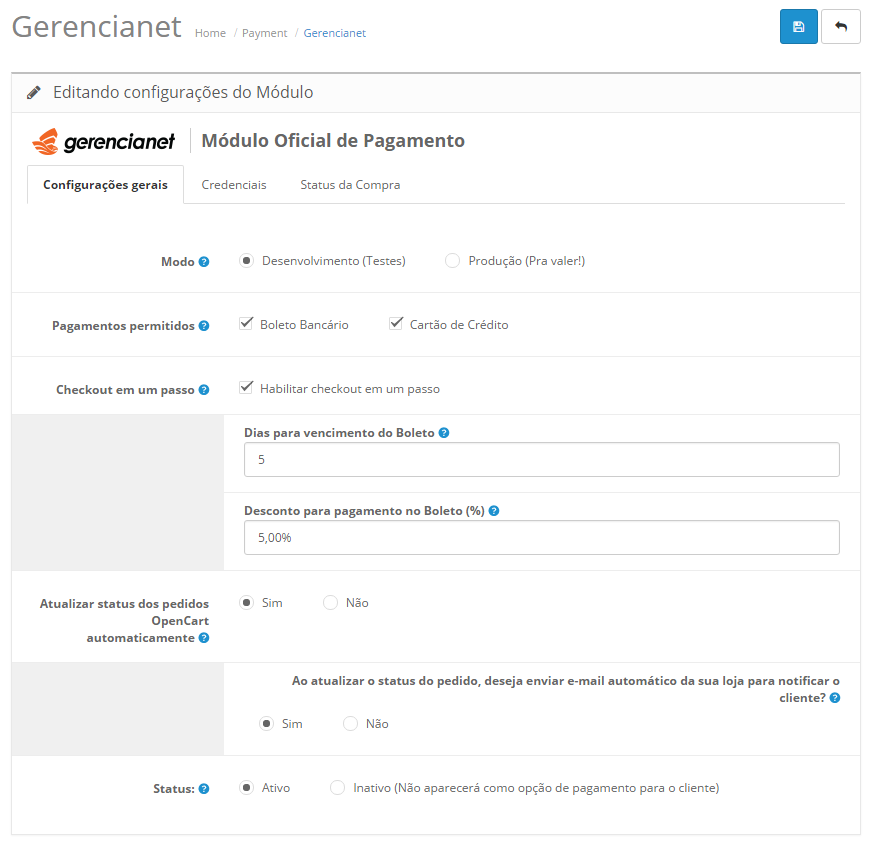
On this tab, the following properties can be configured:
Modo: Determines if the module is in testing mode. In test mode you can generate dummy charges to test the flow;
Pagamentos permitidos: Determines which types of payments will be accepted by the module;
Dias para vencimento do Boleto: Determines how many days the ticket will expire after the date of generation;
Desconto para pagamento no Boleto: You can provide a discount to customers who pay by Boleto Bancário;
Instruções no Boleto Bancário: You can define four lines of up to 90 characters of instructions in Boleto Bancario. If the lines are not completed, the standard instructions will be displayed on the boleto;
Atualizar status dos pedidos do OpenCart automaticamente: Determines whether the module will be able to automatically update the status of an order according to the update notifications sent by Gerencianet;
Envio de e-mail automático da sua loja para notificar o cliente: Notifies the customer via email from your store when an automatic status update is performed. Regardless of the option, Gerencianet will send an email to the customer informing them of the charge;
Status: Determines whether the Gerencianet payments module is Active or Inactive.
Credentials
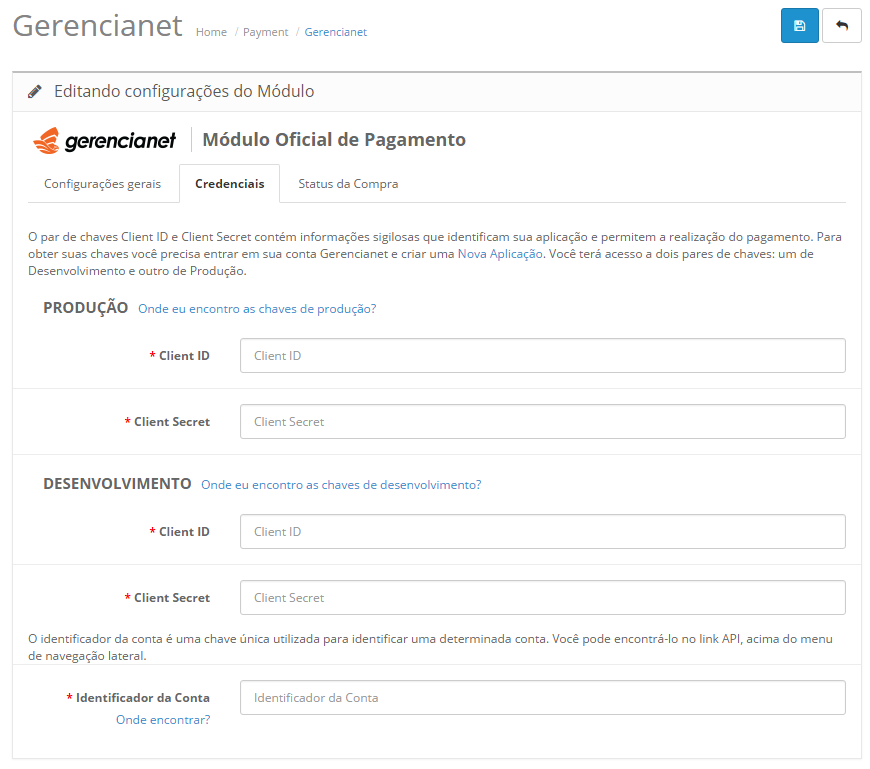
NIn this tab it is necessary to inform the credentials of your application, that is, the "Client_Id" and "Client_Secret" (see where to find it, according to the environment: desenvolvimento and produção) of your application and the account identifier obtained in the application created in Gerencianet.
Tab "Purchase Status"

In this tab is performed the configuration of the Gerencianet Payment Status with the Payment Status of your store. Thus, when there is a change in the payment status in Gerencianet, the order status in your store will be automatically updated according to the defined settings.
CAUTIONS
It is important to note that boletos generated in sandbox are not valid and cannot be paid, they have the typeable line "zero" and a watermark at the bottom stating that it is a test ticket.
Payments for sandbox charges using credit card are dummy even if using a "real" card. All card payments in this environment will have the payment confirmed automatically, but this is just a status change to "Paid" . This feature allows you to test the paid status notification.
This means that all payments made in the sandbox are not real and, therefore, there is no financial charge.
It is important to know that the words Playground, Sandbox and Development Environment, in the Gerencianet context, are synonymous in the sense that they refer to the test site we offer where you can freely test your API integration.
5. Module Operation
After being enabled, the module will already be available as a payment option. Depending on your setting of whether or not to enable the Checkout em um passo, option, the page where the customer will enter their payment details will be different. If the Checkout em um passo option is active, your customer will fill in the payment details on the same Checkout screen, as shown in the figures below:


In this way, when clicking on Checkout, the customer's data will be validated and, if everything is correct, the charge will be generated and the purchase completed. The customer is then redirected to the finalized purchase page.
If the One-step checkout option is not active, your customer will fill in the personal and delivery details on the Checkout page and by clicking on Confirm Order will be redirected to another page to proceed with the payment, where you will choose the Gerencianet payment options, as shown below:

Both payment screens may change according to the theme used in the store.
NOTE
Sand any of the mandatory fields for making the payment is not filled in correctly, it will be charged again in the payment form. For Boleto Bancário, the mandatory fields are: Nome, E-mail, CPF and Telefone. For Credit card, the mandatory fields are: Nome, E-mail, CPF, data de nascimento, Telefone, Endereço, Número, Bairro, CEP, Cidade and Estado.
6. Gerencianet Module Versions for OpenCart
NOTE
During some tests carried out in Opencart 2.3.0.2 regarding the exchange of languages for Portuguese/Brazil, we observed a malfunction in the store, causing, for example, the exclusion of some products from the store, among other problems that were identified. We emphasize that these problems have nothing to do with the module provided by Gerencianet.
To resolve this, go to This issue on OpenCart Brasil github and check how to proceed.
7. Frequent Questions
7.1.Is it mandatory to have SSL in my store to accept payments with the module?
For the Gerencianet module for OpenCart to work, it is not necessary for the store to have an SSL certificate. However, Gerencianet strongly recommends that shopkeepers use it. Regardless of its use, all payment data is encrypted and transmitted securely for payment validation. The presence of an SSL certificate installed in your store guarantees greater security for the merchant and for customers who make purchases. The absence of the SSL certificate on the payment screen can cause the merchant to lose sales, as the customer may feel insecure to enter payment data on a page that does not have a certificate.
7.2. I want to use Transparent Checkout so that the customer does not leave my store to make the payment. It's possible?
Yes. The Gerencianet module for OpenCart uses the transparent checkout to pay customers, that is, at no time will the customer leave your virtual store to complete the payment. Thus, in the last step of the purchase, the customer will be asked for the mandatory data to make the payment.
7.3. Is it possible to use the MarketPlace or Subscriptions features with the module?
Not yet. Follow our changelog para visualizar todas as novidades.
7.4. Payment option installments are not loading. How to fix?
If, after installing and configuring the module, the credit card installments do not load when clicking on the card brands, the merchant must verify the credentials informed in the module configuration (Client_Id, Client_Secret keys and also the "identificador da conta" ("account identifier")). If they are correct, contact Gerencianet so that the problem can be analyzed.
7.5. I'm getting the message "Unauthorized" when trying to complete a purchase. What to do?
This error message may be related to incorrectly entered credentials. Check that your credentials are correctly entered in the respective PRODUÇÃO and DESENVOLVIMENTO fields. Check it out in our FAQ informações detalhadas.
7.6. The message “Gerencianet Desabilitada: Sandbox mode (Test Environment) is active. Your charges will not be validated”. How to fix?
This message will be displayed when your module is configured in a test environment (sandbox). To remove this message and start receiving with Gerencianet, access the module settings in Extensions > Payments > Gerencianet > Editar (or in Extensões > Pagamentos > Gerencianet > Editar) and uncheck SandBox > Habilitar Sandbox Gerencianet (Ambiente de testes).
7.7. Where can I track the transactions generated by the module?
Transactions generated through the module can be tracked in your Gestornet account at the link API > Minhas Aplicações > Sua Aplicação. In this environment you will be able to follow all the transactions and their respective situations.
7.8. QWhen I try to make a payment I get the message *“There was an error trying to make your request. Please contact the store owner.”
This error message can be displayed at checkout for a number of reasons. In this case, the first step is to verify your application's credentials and also check the "request history" subtab in your API see how to use this feature.
8. Support and Suggestions
Your suggestion of new ideas and implementations for the Gerencianet module for OpenCart is very important. So, if you have any ideas, please contact our team. We will analyze your suggestion and evaluate the possibility of implementation..
If you have any questions, please contact us via the website. Gerencianet.